What Is a Kumihimo Bracelet? The Art of Japanese Braiding

Image
If you've ever seen a beautifully intricate, colorful bracelet and wondered about its origins, you might have stumbled upon a kumihimo bracelet . Far more than just a piece of jewelry, these bracelets are a wearable piece of ancient art. So, what is a kumihimo bracelet, exactly? In a nutshell, it's a bracelet created using a Japanese form of braiding known as Kumihimo (組み紐), which translates to "gathered threads." This craft dates back centuries, originally used for practical and decorative purposes on samurai armor, kimono sashes, and religious artifacts. Today, it's a popular and relaxing craft for people all over the world, resulting in stunning, unique bracelets and jewelry. Let's untangle the history, techniques, and reasons behind the popularity of these beautiful creations. The Deep-Rooted History of Kumihimo You can't fully answer "what is a kumihimo bracelet?" without diving into its rich history. The...

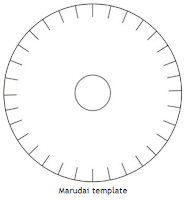
Kumihimo Instruction - Braiding Disk Template

"Kumi" means to braid or gather together and "Himo" means string or cord so "Kumihimo" means simply braided cords. Traditionally Kumihimo is done on a Marudai which is a round wooden stand that the braider would kneel at. Modern braiders tend to braid at tables and Marudai can be made of plastic and more portable versions are simple disks cut from thick foam rubber.

For a simple eight-strand braid you will need:

  • A sheet of thick card
  • 2 strands of thread or yarn a meter long in one colour
  • 2 strands of thread or yarn a meter long in another colour
  • Scissors


Instructions

  1. First make your Marudai, use the template below to cut one from your card.
  2. Fold your 4 strands in half and knot them to make a loop, push this through the hole in the centre of your Marudai and wedge the strands into the slits as shown
  3. Move the top right strand to the slit to the right of the bottom pair then the bottom left strand to the slit to the left of the top strand.
  4. Rotate your Marudai a quarter-turn anti-clockwise and repeat with the two other pairs.
  5. Continue working this way until your braid is the desired length then knot it and trim away the excess thread.

maru dai, marudai, kumihimo marudai


Related Posts:
, , , ,

Comments

Popular posts from this blog

7 Strand Kumihimo Braid Directions

Kumihimo Braids - Seven Strand Braid

Kumihimo Patterns for the Kongo Gumi Braid